Profile Editor
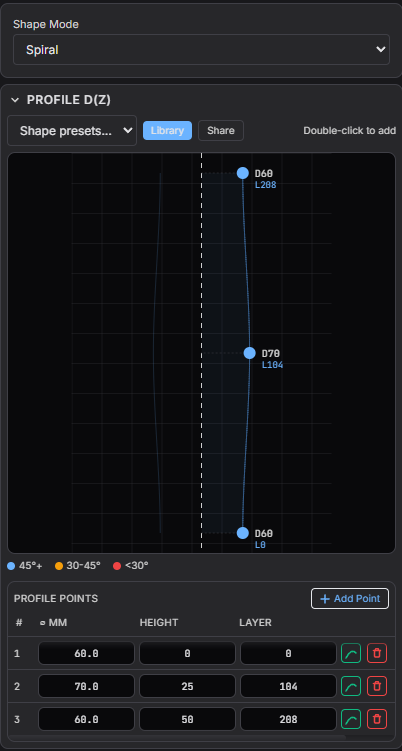
The Profile Editor defines the base silhouette of your print using a Bézier curve. It maps height (Z) to radius—so every point on the curve answers: "At this height, how far from center is the wall?"
How It Works
- X axis: radius from the centerline (not diameter)
- Y axis: height from bottom to top
Each point on the curve defines the target radius at that height. Effects are applied on top of this base profile.
Two synchronized editors
You can edit the profile in two places at once — they share the same data and update each other live:
- Side panel canvas — the classic 2D editor with the radius–height graph, the points table, and presets.
- In-viewport overlay — a draggable curve rendered directly on the silhouette of the 3D model. Auto-enabled while the Create or Effects tab is open; no toggle to flip on or off.
The overlay tracks the camera-facing meridian of the model. Orbit, pan, zoom, and damping all keep the curve glued to the silhouette in real time. When you tilt to a near top-down view (~5° of the Z axis) the silhouette becomes degenerate, so the overlay smoothly fades out and re-appears as you tilt back.
Auto-fit canvas — proportional drag at any size
The side-panel canvas auto-scales so the model always fills it. Internally the maximum visible radius is max(20 mm, maxR × 1.25) — there is always at least a 20 mm view, and a small 25 % headroom past your widest point so you have somewhere to drag a wider radius into.
This means the canvas is in proportion with your model. A small 30 mm vase no longer feels twitchy, and a tall 200 mm planter no longer clips at the edges. One pixel of mouse movement is roughly the same number of millimeters that pixel represents on screen.
To keep that feeling stable mid-edit, the visible scale is locked when you press the mouse down on a point or handle and only re-fits after you release. Without the lock, dragging a point outward would shrink pxPerMm continuously and the cursor would run away from itself.
A Good Shaping Workflow
- Start with the minimum (2–3 points) to block out the overall form
- Add points only where you need local control (neck, shoulder, lip)
- Refine with handles for smooth transitions
- Preview with a simple effect (or none) before stacking complexity
Curve evaluation (Bézier in height and radius)
The visible spline is a true cubic Bézier in (height, radius) — the same curve you edit with anchors and handles. Preview, radius sampling, and overhang / tangent coloring all follow that curve.
If a segment’s height is not strictly increasing along the cubic (from extreme handle positions), the engine falls back to a legacy height parameterization using radius change only, so values stay finite and printable.
Controls
Drag point- Left click + drag to move a control point. Works in the side-panel canvas and on the in-viewport overlay.
Drag handle- Left click + drag to adjust the curve tangent. On Smooth points the opposite handle mirrors direction (lengths stay independent).
Shift + drag- Fine control: cursor delta scaled to 10% so you can land on the exact value you want.
Alt + drag handle- Break tangency: only the dragged handle moves, the point auto-promotes to Broken mode (Illustrator-style).
Add point- Double click the curve to add a new control point.
Delete point- Right click a point or press Delete / Backspace (minimum 2 points required).
Cycle selection- Tab / Shift+Tab walks through points by height; Escape clears selection.
Nudge selection- Arrow keys move radius / height in small steps (interior points only for height).
Point modes — Smooth, Broken, Sharp
Every interior control point has a mode — three buttons in the points table or the floating selection toolbar:
Smooth (G1)- Handles are linked: opposite directions, lengths kept independent. The curve flows continuously through the point — the right pick for organic vases, bottles, and bowls.
Broken (G0)- Handles still exist but move independently. Use this for a corner that still has tangent control on each side (e.g. a smooth approach into a hard transition). Visual cue: handle link lines render dashed and a small chevron sits on the anchor.
Sharp- Handles collapse to zero. The curve passes through as a corner. Use this for stepped vases, pure cylinders, or any geometric edge.
The fastest way into Broken mode is Alt + drag a handle on a Smooth point — the point promotes to Broken on the first frame of the drag and only the dragged handle moves. Switching back to Smooth from Broken reconciles the handle directions (averages the two angles) while preserving each handle's length, so you don't lose the curvature you spent time on.
Stroke coloring — theme + overhang feedback
The profile curve uses your theme's Accent Primary color while the overhang stays in the safe zone (≤ 45° from vertical). The same color is used by the spline anchors and handles, so the line and the dots always read as one consistent element. Past the safe band the stroke fades to warning (yellow / amber, 45° – 60°) and danger (red, > 60°) so steep overhangs jump out before you slice.
The same coloring is used in both editors — the side-panel canvas and the in-viewport overlay — so what you see on screen is the same printability story everywhere.
Common Profile Shapes
| Shape | Description |
|---|---|
| Cylinder | Straight vertical line (constant radius) |
| Cone | Diagonal line from wide bottom to narrow top |
| Vase | S-curve with narrow neck, wide body, narrow base |
| Bowl | Curve that expands outward then curves back |
Shape Modes
The profile curve defines the silhouette for all shape modes. Select the mode from the Shape Mode dropdown:
| Mode | Description |
|---|---|
| Spiral | Default. Continuous Z-spiral with seamless single-wall output (classic vase mode) |
| Layer Mode | Flat horizontal layers with configurable perimeter count (1–10) and seam placement |
| Contour Wave | Woven lattice where layers undulate in Z and interlock |
| Julia Stack | Fractal boundary shape from Julia set mathematics |
Print-Safe Tips
- Avoid extremely thin necks until you've validated your extrusion and cooling.
- Keep transitions smooth if you plan to use larger displacements in the Effects Stack.
- If you see self-intersections or extreme "pinching" in preview, simplify the curve (fewer points, gentler handles).
- In Layer Mode with multiple perimeters, ensure the profile radius is wide enough to fit all perimeter insets.