Layer Mode
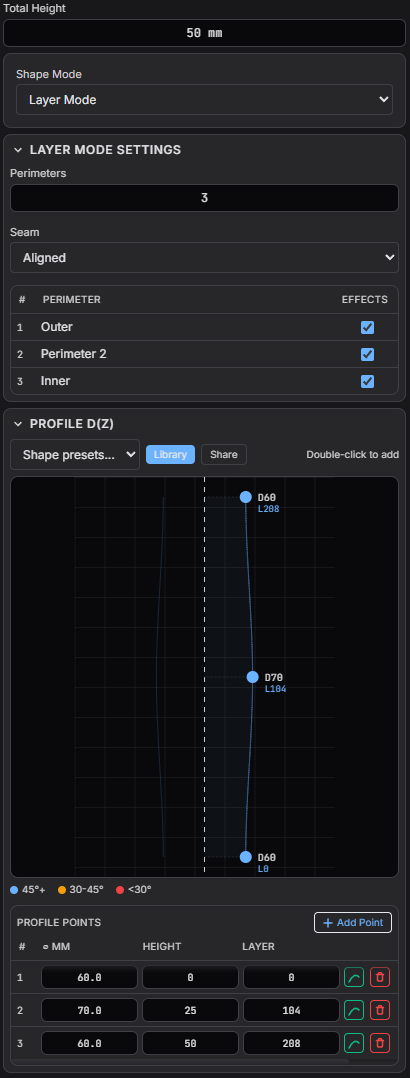
Shape ModeLayer Mode generates flat horizontal layers instead of the default continuous spiral. Each layer is a closed loop at a fixed Z height, and the nozzle steps up to the next layer with a proper retraction and Z-hop. This unlocks multiple perimeters per layer, giving you thicker, stronger walls.
When to Use It
- You need walls thicker than one extrusion width (2–10 perimeters)
- You want discrete layers with controlled seam placement
- You're printing functional parts where wall strength matters more than surface continuity
- You want to use all existing effects (they work identically in Layer Mode)
How It Works
In the default Spiral mode, the nozzle traces a continuous helix—Z increases smoothly within each revolution, producing seamless walls but only one perimeter thick.
In Layer Mode, each layer is printed as one or more closed perimeter loops at the same Z height:
- The nozzle completes a full closed loop at height Z
- If multiple perimeters are configured, the nozzle travels inward by one line width and traces the next perimeter
- Once all perimeters for the layer are done, the nozzle retracts, Z-hops, and moves to the seam position of the next layer
- This repeats for every layer
Parameters
Perimeters- Number of concentric wall loops per layer. Range: 1–10. Each additional perimeter is inset by one nozzle line width. Default: 1.
Seam- Where each layer's perimeter starts. "Aligned" places all seams at the same angle (clean vertical seam line). "Random" scatters the start position per layer (hides the seam but may leave small artifacts).
Effects (per perimeter)- Checkbox per perimeter (visible when 2+ perimeters). When checked, effects from the Effects Stack are applied. When unchecked, the perimeter follows the plain profile contour with no modulator influence.
Infill- Optional generative fill inside the innermost wall. Default none (walls only). Patterns: rectilinear, grid, concentric, honeycomb, gyroid, Hilbert, or SVG clip. Density 0–1; optional height curve. Top solid layers use rectilinear at 100% density.
Perimeters
Each perimeter is offset inward from the previous one by the line width (nozzle diameter × width multiplier). The outermost perimeter follows the profile shape exactly; inner perimeters are progressively smaller.
Seam Placement
| Mode | Behavior | Best for |
|---|---|---|
| Aligned | All layers start at the same angular position (0°) | Clean vertical seam line; easy to sand/hide |
| Random | Each layer starts at a pseudo-random angle | Scatters the seam so no single line is visible |
Spiral vs Layer Mode
| Spiral (default) | Layer Mode | |
|---|---|---|
| Z movement | Continuous ramp | Flat per layer, discrete Z steps |
| Perimeters | 1 (single wall) | 1–10 configurable |
| Seam | None (seamless spiral) | Aligned or Random |
| Wall thickness | One extrusion width | Up to 10× extrusion width |
| Infill | None (vase) | Optional generative patterns + top solids |
| Surface finish | Smooth, no seam line | Visible seam (can be hidden with Random) |
| Layer transitions | Smooth Z ramp | Retract + Z-hop between layers |
| Effects | All supported | All supported |
Getting Started
- Open the Shape Mode dropdown in the left panel
- Select Layer Mode
- Your profile shape (spline) still defines the silhouette—adjust it as usual
- Set Perimeters to the number of walls you want (start with 2)
- Choose a Seam strategy (Aligned is a good default)
- Add effects from the Effects Stack as normal—everything works
Per-Perimeter Effects
When you have 2 or more perimeters, a table appears in the Walls card listing each perimeter with an Effects checkbox:
- Checked (default): The perimeter receives all effects from the Effects Stack — radial displacement, Z modulation, XY shift, extrusion texture, speed changes, and holes.
- Unchecked: The perimeter follows the plain profile contour only — a smooth wall at the base radius with no modulator influence.
This lets you combine decorative outer walls with structurally plain inner walls. For example, set 3 perimeters and disable effects on perimeters 2 and 3 — the outer wall carries your pattern while the inner walls provide solid structural support. Each effect can also set Apply to walls: All, Outer, or Inner.
When to use vase vs multi-wall
Use Spiral (vase) when you want a single continuous wall, the classic 3dSynth look, and the smallest G-code. Old projects and library shapes stay on this path.
Use Layer Mode (multi-wall) when you need 2+ perimeters, infill, or top solid layers. It is opt-in from Shape Mode. Missing generationMode still means vase.
Tips
- Start with 1 perimeter to verify your profile looks correct, then increase
- Aligned seam is easier to post-process (sand the seam line)
- Random seam is better for display pieces where you want no visible line
- Disable effects on inner perimeters for clean structural walls behind a decorative outer shell
- All global transforms (Twist, Bend, Taper, Stretch) work with Layer Mode
- Bottom Cap and Top Cap effects work normally—they already use flat layers internally